|
|
|
I discovered infrared photography in 2001 when I added a Hoya R72 infrared filter to the Lensmate adapter on my Canon G1, put the camera on a tripod and pressed the shutter. I've looked at the world differently ever since. Foliage was magic. Pink, magenta and occasionally orange hues signaled an entry into a new realm of otherworldly photography. Later I would learn how to manage the colors and come to appreciate the look of infrared black-and-white but in the beginning the charm was in creating something so different from what we normally see around us. If there was any problem, it was the necessity of a tripod, which served to point out the major shortcoming of using a stock Canon G1 for infrared photography -- slow shutter speeds. Not only was 1/20th of a second the fastest shutter speed I could expect on a fiercely sunny day, but even when the camera was rock-solid on a tripod, everything in front of the camera was moving -- foliage in the breeze, people on their way to somewhere else. The culprit is the internal infrared cut filter ("cut" as in cuts infrared light down or out, depending on its strength), also known as a hot mirror. Cameras have them to reduce infrared light in order to produce better color photos. Months later I learned it was possible to replace the infrared cut filter with clear glass. I was lucky enough to find someone to modify my cameras for me (see notes at end of page). He doesn't do conversions anymore -- as you'll soon discover why -- but he thoughtfully documented the process for those bold enough, or desperate enough, to attempt their own. If you're one of those people, this tutorial is for you ... and the result will be handheld infrared photography with normal shutter speeds. Read through the tutorial first and don't forget to check other users' comments at the end of the page. Glass Facts FirstThis first section will help you decide whether or not to even think about putting screwdriver to camera case. You need to know how to cut glass, or be willing to learn how (it's rather fun, not very difficult and a useful skill), or know someone who will help you. Color Advisory -- Once you modify your camera, it will only shoot infrared. I suppose it's possible to find a screw-on filter that duplicates the effects of the infrared cut filter so you can shoot color, but your best bet is to consider your converted camera infrared-only. Glass Challenges -- To convert your camera, you'll replace the infrared cut filter with clear optical glass, so your first task is to get the glass. What you should know right up front is that there is no one piece of glass that works in every camera, even if they're the same model. I own two modified G1s and each uses a different thickness glass (same height and width, however -- a bit of good news). So you have a choice of purchasing various thicknesses of glass before you begin, or gambling that one thickness will work and when it doesn't, ordering another thickness glass and trying again. Glass Sources and Sizes -- You can get window material from optical houses, optical surplus sources, or from clear or almost clear filters. Do not use a laminated filter -- you cannot cut it with a conventional glass cutter because the center layer is flexible, making it impossible to break along the score line. You can tell if a filter is laminated by looking at its edge, although you might have to wet it to see the layers. For the G1, glass between 2.57mm and 3.09mm thick has worked on these modifications, with 3.09mm being the most frequently successful. If you want to gamble on just one thickness, try 3.09mm first. Cost and Focus -- Having custom windows made to high tolerances is very expensive. If you order off-the-shelf windows from an optical house like Edmund Industrial Optics, typical thickness tolerances are plus or minus .2mm or about .008". Don't be too obsessive about getting perfect focus at all apertures. The difference between getting good focus between f2 and f6.3 and good focus between f3.2 and f6.3 might only be .002" in window thickness. Tony says his converted G5 is best at around f4 which at wide zoom has all the DOF necessary for landscapes, although he sometimes uses the built-in neutral-density filter in really bright situations. For the G1 you probably want good focus at f5 or smaller if you're using an R72 or equivalent in bright sunshine. If you're using a darker filter like an 87C, you could get away with using larger apertures (smaller f-numbers). Alternative Glass Source -- After I posted this initial modification tutorial, Hiroyuki Yoneshima wrote to tell me about his success using glass microscope slides. Before you dismantle your camera, check out what he has to say at the end of the page. Glass Scoring -- Consider taping the glass with something like 3M blue tape to protect it while you're cutting and smoothing the edges. You can mark the dimensions on the tape -- 11mmx12mm -- then give yourself an extra millimeter or so. Make a first pass with the glass cutter and press just hard enough on the tape to indent it without scoring the glass. This helps guide the cutter when you make the second pass, pushing just hard enough to get through the tape and score the glass, making sure the score runs the full length of the cut (from glass edge to glass edge). Glass Snapping -- You then need to hold the glass securely so you can snap it along the score line. For such a small piece of glass, you could use a pair of small crescent wrenches, or clamp it in a small smooth-jaw vise along the score line and grab the exposed portion with a small crescent wrench. Whichever way you hold it, tighten the wrench snugly around the part you want to break away and push it away from the side with score. It should break away fairly cleanly if the score was good. Glass Finishing -- One way to clean up the edges is to use a diamond knife hone -- medium or fine grit. With water trickling over the stone (watch out for sharp glass edges), pass the glass lengthwise over the hone until it's fairly smooth while checking its dimensions occasionally and keeping things square. Or simply use fine-grit wet/dry sandpaper, either wet or dry. Glass Chipping -- Don't worry too much about minor edge chipping -- the image circle is well within the rectangular edges of the window. When you're done, remove the tape and clean with alcohol. What You Need1. Canon G1 or G2. The G1 is used below as a photograph reference, but the two cameras are vitually identical inside. You'll find comments on the G3 and G5 in the notes at the end of this page. 2. Philips screwdriver (Wiha OX50 or equivalent). This driver is about 3mm in diameter and is actually a little larger than necessary. More importantly, the tip should be in perfect condition and a tight fit in the screw. 3. Small (2mm) slot-head screwdriver for prying and other duties. Magnetize both drivers and it will make the job much easier -- especially starting screws. 4. Optional: Pressurized air. Keep all screws organized and identified -- there are different lengths, colors, and thread types. Screws that go into plastic have coarser threads than the ones with machine threads. You don't want to mix these up. Removing the IR Cut Filter1. Remove the battery and CF card. While the CF door is open, remove the screw at the top (the one concealed by the top of the CF door), and then the silver one just outside the lower part of the CF door. 2. On the left side, remove the silver screw next to the MF button. 3. On the bottom, remove the two black screws, then the black screw next to the optical viewfinder. 4. Fully open the LCD, open the CF door and you should be able to lift the entire rear case cover straight up. Set aside and look for the spring that was under the 4-way toggle. Remove it or it will surely be dislodged and lost later as you work on the camera. 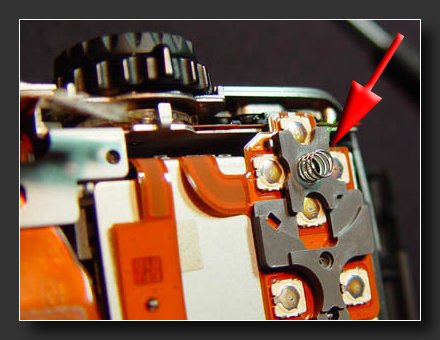 5. Next, pry up gently on this connector until it pops off. 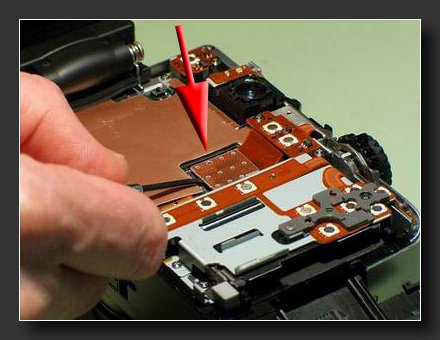 6. Then remove the screw just underneath that holds the copper shield down. 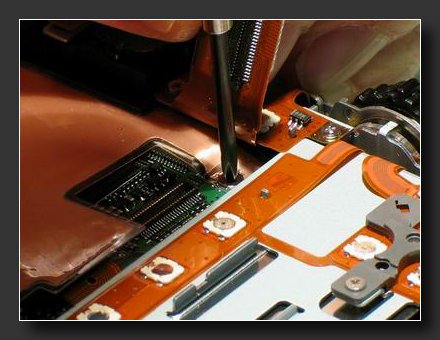 7. Carefully lift the corner of the shield that was screwed down, and note that the left side is tucked under the LCD hinge housing. 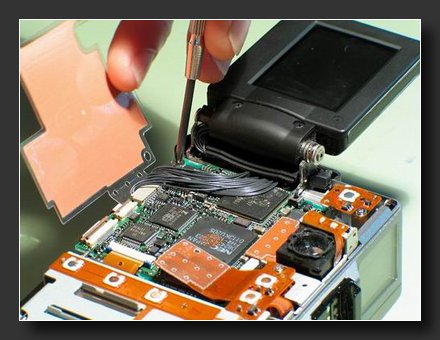 8. The shield is still connected at the bottom, move it out of the way so you can remove the screw in the lower left corner of the circuit board. 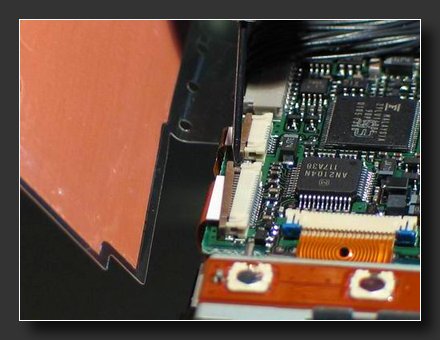 9. Now, with the small slot head (straight bladed) screwdriver, open these 3 connectors by sliding the colored half away from the white half as shown in the photo. Once opened, the ribbon should come out of the connector with little effort. You can slide the round part of the screwdriver shaft in the loop of the ribbon to tug on it if necessary. You can wait until you're ready to lift the circuit board out to remove the larger ribbon on the right as it's difficult to remove at this point. 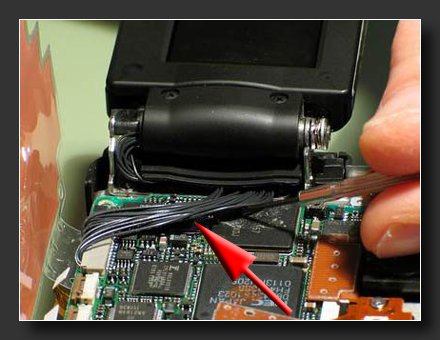 10. Now we need to get this bundle of wires out of the way. They're stuck down with a double stick adhesive, so gently work them loose, then extract the bundle out from under the LCD hinge. You can now lift up on the lower left corner of the circuit board (you can now pull that side ribbon out too as you lift) and it should come up easily. Be careful with the small wires when moving the board around. Note that the board is still connected at the top. I use a piece of low bond tape to hold the board up out of the way, but you might want to disconnect it completely the first time you do this if you find it a hindrance to working on the CCD below it. 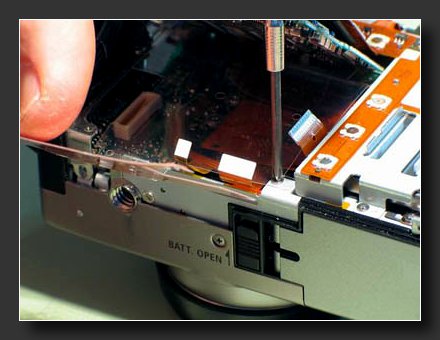 11. Remove the last screw holding the shield in place and take note of how it fits under the board. Remove the shield. 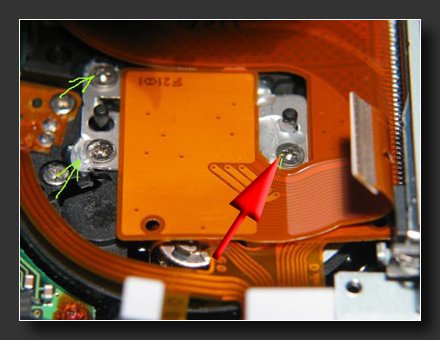 12. Now you can see the 3 screws holding the CCD down. Note that they're locked into place with a bit of adhesive. If you're lucky, the screw heads will be clean of the stuff so you can get your driver into them and just turn them out. You still will need to break the bond where the glue is stuck to the guide post (just above the right side screw). Be VERY careful as you do this - you don't want to slip and damage any of the ribbons in the area. Also avoid distorting the thin aluminum plate that the CCD is mounted on by applying excessive force. You don't need to remove all of the adhesive - just any parts that are holding the CCD fast. I have had good results by using a fine tip needle nose pliers and squeezing and prying any offending blobs of adhesive to break them up. When the CCD is loose, (but not removed) invert the camera and shake out any loose bits and blow with pressurized air. 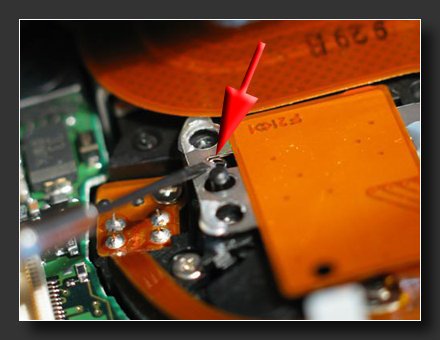 13. When you're ready to extract the CCD, take note of the tiny spring under the CCD mounting plate on the left side between the screws. I'm not sure what function it serves, but you should probably save it anyway. 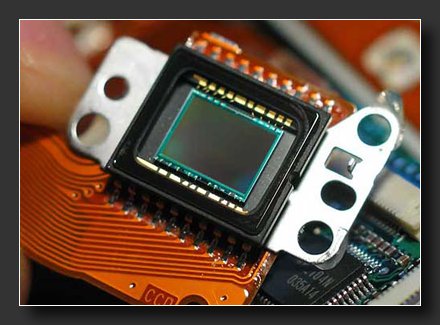 14. Now you can lift the CCD out, holding it by its ribbon. Here's what the sensor side looks like. Don't touch it and put it in a clean sealed container. 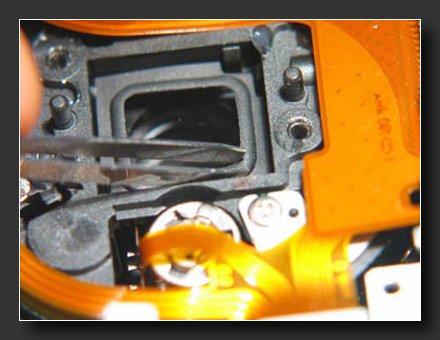 15. Remove the rubber gasket over the IR blocking filter by just lifting it out -- be careful not to scratch the IR blocking filter under it. 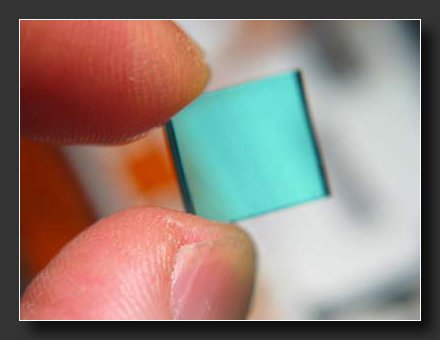 16. To remove the offending filter, just invert the camera over a clean tissue and it will fall out. Handle it by its edges when you pick it up -- it has a coating that it very difficult to clean. Installing the Clear WindowTo install the window, pick up the camera and with the lens facing forward and give the recess that holds the window a blast or two of compressed air from a few inches away. Avoid using compressed air on a lens from a shorter distance -- you can end up injecting dust into the lens. Lower the clean window into place, then the rubber gasket, then the CCD (check for dust and clean with air if necessary). Tighten the 3 screws gradually, watching for the CCD to seat correctly, then snug the screws. Reverse the disassembly procedure -- be sure the ribbons are fully inserted before they're locked down. If there's a problem when you're done, it's most likely caused by incomplete insertion. Testing the Modified CameraUse a tripod and an IR filter. (You may also need a ND filter if f2.0 is overexposing, which it will with an R72 on a sunny day.) Use full wide angle for testing focus. On a sunny day, shoot a scene that's at least 100 feet (30 meters) away, ideally with a lot of detail. Shoot at all apertures. Be sure the camera is focusing in the distance and not on something in the foreground. Review at 100% and note which, if any, apertures are the sharpest. As a general rule, when the larger apertures (f2.0-3.2) are sharp and the smaller apertures (f6.3 - 8.0) are soft, you need a thicker window. When the smaller apertures (f6.3 - 8.0) are sharp and the larger apertures (f2.0-3.2) are soft, you need a thinner window. Aperture f8 in infrared will never be very sharp because of diffraction effects. Have fun. |
|
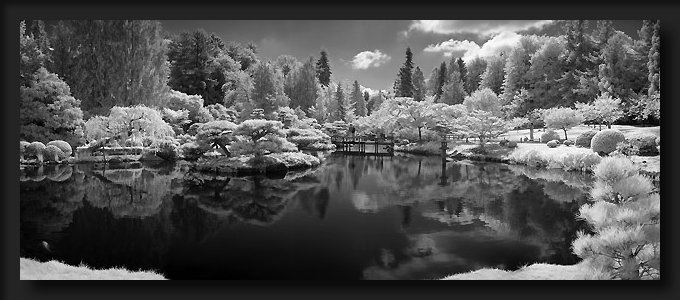
The author and photographer of this tutorial and the landscape scene above is Tony Kaplan of Lensmate. If I told you everything that he and his partner Susan Doel have done for me and my photography over the years, I would embarrass them ... and perhaps myself. Suffice it to say that it has been a personal and professional pleasure to have met them through the Internet and their service and products are unmatched. Tony has done enough infrared conversions to know what he's doing -- and to know he doesn't want to do any more. Rather than abandoning us, however, he documented the conversion process above so we can do our own -- or talk a handy friend into doing it for us. If you have thoughts, recommendations or reports, please send them to me at don@kleptography.com and I'll update this page as needed to include your experiences. For G3 and G5 owners, from Tony -- The G3/5 is laid out a little differently that the G1 and G2, which are almost identical, but I think someone handy could figure it out based on the G1 instructions. The G3/5 requires a really tiny torx tip - a Wiha 267 T 3X40. You have to have this tool to remove the CCD -- no substitutions. You can find these online in the US$7 - 8 range. With the both the G3 and G5, I experienced the following AF issue -- While the ideal window thickness should have been 2.3mm - 2.4mm, I could not get focus confirmation at full wide angle until I tried a thinner window like 2.0mm. This problem only occurred at the full wide zoom setting (at any aperture). If you zoomed the smallest amount toward tele, the AF worked fine. I also found that if the camera was in the macro mode, it would focus fine with the thicker window, but this adds a second or so to the total auto-focus lag time which I found undesireable. This might be a non-issue to someone exclusively shooting landscapes, or you could manually focus using hyperfocal distance. I settled for the thinner window which focused best around f4, which has plenty of DOF for wide angle -- and with the G3/5's built-in 3-stop neutral density filter, overexposure isn't a problem, even with an R72 filter. The G3 produces has an interesting false color scheme with an R72 when manually white balanced -- tan skies and frosty pale blue foliage. The G5 produces a virtually monochromatic grey image when manually white balanced. In fact, it's hard to see a difference sometimes between the original and greyscaled image. Viewing the Results, from Don -- You'll be a lot happier with this project if you have a second camera devoted to color and remember that there are no guarantees in life. Each of my three G1s turned out slightly different, as though each had its own personality. In that respect, they are like meeting new friends and learning their individual quirks and characteristics. Taken in that spirit, you should be happy with the outcome -- and if you're not, you can always use this tutorial to return your camera to its original state. One quick word on infrared filters which I will expand on later -- with the unmodified Canon G1, I used the popular Hoya R72 near-infrared filter ("near" because it allows some visible light through, which often results in interesting pastel color patterns). After modification, however, the camera produced photos with an overall greenish hue, as well as slightly lessened contrast -- not nearly so charming to my eye, so I began converting them to black-and-white. My lament for the pastels didn't last long because of a new-found appreciation for black-and-white photography, especially in infrared. To boost contrast, however, I bought a true infrared filter, the B+W 093, which lets no visible light through and produces virtually black-and-white images straight out of the camera. I've been very pleased with the results and the shutter speeds, although not quite so fast as with the R72, are still in the near-normal range. It's not unusual to shoot 1/500th of a second on a bright day. And with that, I'll get this page posted so you can get started. When I have time, I'll create another page with a few tips on glass cutting, some additional thoughts on infrared photography and image processing, and the experiences of those who convert their cameras. Please let us know how you get on. Below is feedback from people who have done their own conversions. The first suggestion is an idea from Hiroyuki Yoneshima that might solve your glass concerns. The Hiro SandwichAs you may have noticed, I went on a bit in the beginning of this online tutorial about finding and cutting glass. Hiroyuki Yoneshima offers an alternative approach that he found to be easier, cheaper and more flexible -- microscope slides. Not only are slides widely available, you can also purchase cover slips -- those little square windows about 0.17mm thick that you cover your specimens with -- to fine-tune the final thickness of the glass sandwich you're about to create. Overview -- Hiroyuki cut three pieces of 0.89mm microscope glass to 11x12mm and stacked them to create a window 2.70mm thick (the extra 0.03mm of thickness is caused by the adhesive). This 2.7mm turned out to be the final size for his G1 -- he didn't need to use cover slips to increase the thickness to achieve good focus throughout the zoom range. Slide Measurements -- The thicknesses of slides and cover slips vary because of manufacturing tolerances and variations. You should check listed tolerances and variations before ordering and measure the actual thickness with calipers before gluing everything together. Adhesives -- To glue the individual glass plates together, he uses "Entellan neu" from MERCK, but often sees "EUKITT" from EMS (Electron Microscopy Sciences) in laboratories. Any permanent mounting media for biological specimen will do. Use a minimum amount to glue the layers and let it dry for about 12 hours before installing because the adhesives contain organic solvents (often xylene) which may harm your camera. Note that there are also aqueous mounting media that are not permanent. Craftmanship -- Hiroyuki admits the edges of his window are jagged and not perfectly aligned in the recess, but because the edges are outside the image circle, it doesn't affect his photos. Result -- His three-layered 2.70mm window falls between the 2.57mm and 3.09mm range noted by Tony and, while he did not measure the actual refractive index, he has not experienced any focus problems. Thoughts on Assembly and Focusing -- Hiroyuki suggests that the reason each G1 requires a different thickness window might be due to slight variations in the flange back caused when the CCD is re-installed: "In the manufacturing process, Canon may first adjust the flange back, then seal the screws and finally assemble the lens unit (with the CCD on) into the camera. The sealed screws suggest that you may be able to solve the focus problem by adjusting the flange back rather than the thickness of the window." If you have comments on this approach after converting your own camera, he (and we) would like to hear them. Durability -- As for longevity of the glass slides, Hiroyuki says, "I have never experienced or heard of degradation or degeneration of these glass or permanent mounting media. They will stay good for decades." Infrared Filters -- Hiroyuki takes a different approach than the R72 and 093 filters that I use: "I use triacetyl-cellulose film from FUJIFILM as long-pass filters. I cut and put them in front of the lens (using adhesive tape). They are cheap and I can easily change the cut-off wave-length. If you put the cut-off filter inside, I am afraid that you cannot change the wave-length and that the coating can degenerate in months or years." In conclusion, microscope slides sound like an excellent solution to the glass challenge and they obviously work. Because there are multiple layers of glass, just be sure to clean each one well before assembling. Thanks very much to Hiroyuki Yoneshima for sending this information just days after returning from mountain-climbing in Yosemite, California. Here he is on the face of Half Dome in a self-portrait -- probably thinking about adhesives...  |